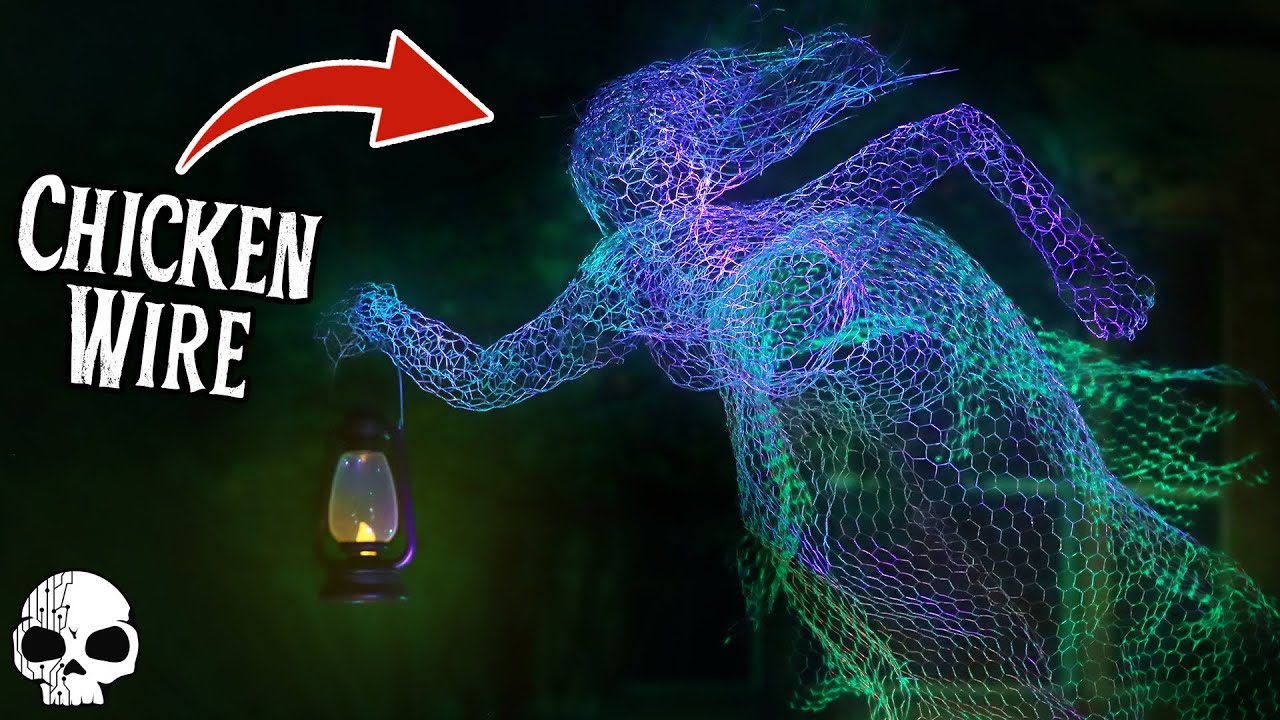
If you’re looking to add a unique and spooky touch to your Halloween decorations, look no further than the DIY Glowing Chicken Wire Ghost Tutorial. This tutorial by Wicked Makers demonstrates how to create an easy-to-make Halloween prop using basic tools and materials like chicken wire, pliers, and glow-in-the-dark spray paint. Hanging the ghost with fishing line gives the illusion of floating, making it a perfect addition to your haunted yard.
With the help of a body form, you can shape the chicken wire ghost for human proportions, creating a ghostly figure with arms, torso, head, shoulders, and a flowing skirt. This DIY Halloween prop is not only one of the easiest to make, but it also offers a unique and eerie effect with just a few materials and a creative touch. Whether you’re a Halloween enthusiast or just looking to spook up your decorations, this tutorial is a must-try for anyone wanting to create a glowing chicken wire ghost.
Materials Needed
To create a glowing chicken wire ghost for Halloween, you will need a few key materials. These include chicken wire, an old mannequin, pliers, wire snips, fishing line, a Halloween lantern, and glow-in-the-dark spray paint. Each of these items plays a crucial role in bringing your ghostly creation to life and adding that spooky touch to your Halloween decorations.
Creating the Frame
The first step in making your chicken wire ghost is to establish the frame or structure for your prop. To create the frame, you will use an old mannequin as the base. Shape the chicken wire around the mannequin using pliers to mold it into the desired shape. Once the wire has been shaped, you can use wire snips to cut off any excess wire and ensure a clean and precise frame for your ghost.
Forming the Ghost
After creating the frame, you can begin forming the actual ghost using the chicken wire. Start by focusing on the arms and torso of the ghost, shaping the wire to create a lifelike outline. Next, move on to crafting the head and shoulders of the ghost, paying attention to detail to achieve a realistic and eerie look. To complete the ghostly figure, shape triangular wire pieces to form a flowing skirt that will add movement and depth to your prop.

Assembly
With the frame and ghost form in place, it’s time to assemble the different parts together to create a cohesive structure. Use wire or fishing line to attach the pieces securely, ensuring that the ghost is stable and well-constructed. Take your time during this step to ensure that each part fits together seamlessly for a polished final result.
Adding Details
To enhance the spooky effect of your chicken wire ghost, consider adding some key details. Position a Halloween lantern inside the ghost’s head to create a glowing effect that will add to the overall ambiance. Additionally, spray paint the ghost with glow-in-the-dark paint to give it a haunting and spectral appearance that will stand out in the dark.
Hanging the Ghost
To showcase your glowing chicken wire ghost, use fishing line to hang it from your desired location. Adjust the height and positioning to create the illusion of the ghost floating in mid-air, adding to its eerie and ethereal presence. By carefully hanging your ghost, you can elevate the overall effect and make it a focal point of your Halloween decorations.
Enhancing the Effect
To take your chicken wire ghost to the next level, consider enhancing the effect with additional elements. Incorporate Halloween lights around the ghost to illuminate and highlight its features, adding an extra layer of spookiness. For an even more dramatic effect, use a fog machine to create an eerie atmosphere that will captivate and thrill your Halloween guests.
Additional Tips
As you work on creating your glowing chicken wire ghost, keep in mind a few additional tips to make the process smoother and more enjoyable. Work in a well-ventilated area when spray painting to ensure your safety and avoid inhaling fumes. Take breaks during the construction process to prevent hand fatigue from working with wire and tools for extended periods. Experiment with different poses and shapes for your ghost to create a unique and personalized Halloween prop that reflects your creativity.
DIY Inspiration
For further guidance and inspiration, check out tutorials by Wicked Makers and Rachel Maxie. These resources can provide valuable tips and ideas on using chicken wire to create Halloween props and decorations. By exploring different tutorials and techniques, you can expand your creativity and customization options when making your own glowing chicken wire ghost.
Conclusion
Creating a glowing chicken wire ghost is a delightful and straightforward way to add a distinctive touch to your Halloween decorations. By following the steps outlined in this tutorial and incorporating your creative vision, you can craft a spooky and eye-catching prop that will impress your guests and elevate the Halloween ambiance. Enjoy the process of crafting your own unique Halloween decoration and relish in the eerie effect of your DIY prop that will surely leave a lasting impression.


