
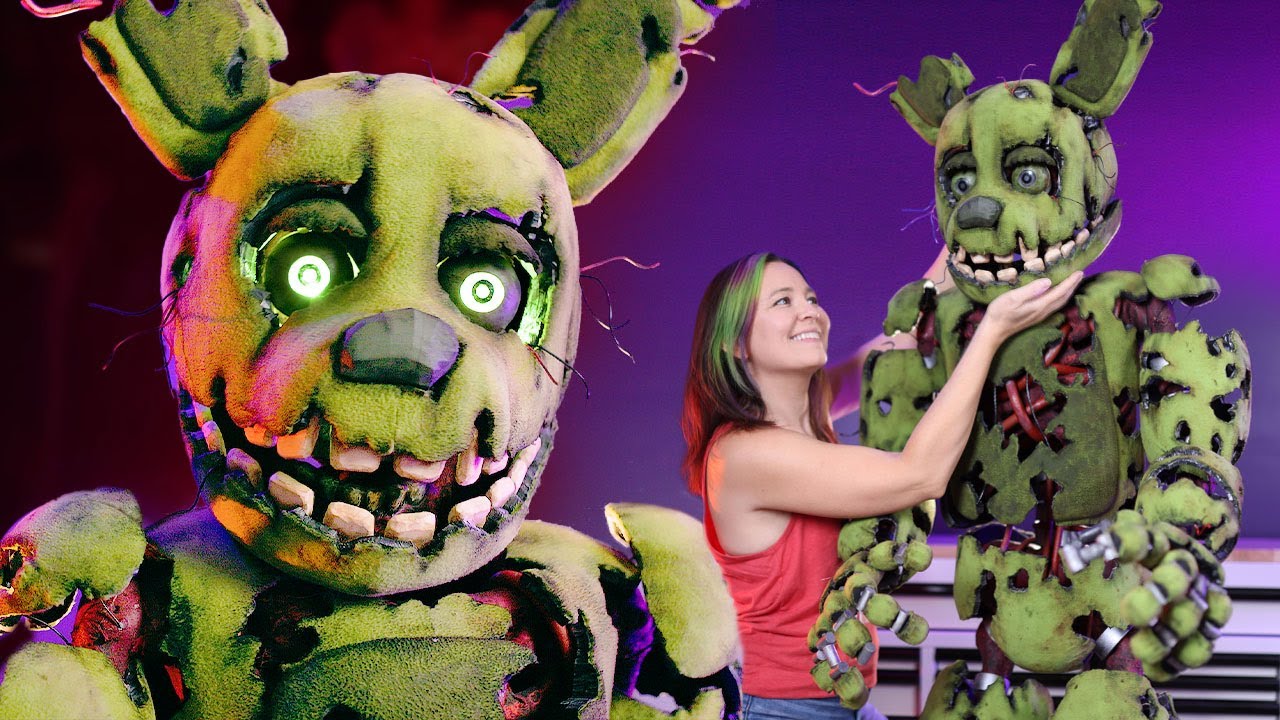
You decided to take on the challenge of creating your very own Springtrap animatronic from FNAF after being inspired by Jay and Jaimie’s DIY project. Using a Target animatronic skeleton as the base, you combined EVA foam and 3D printed parts to bring Springtrap to life. The process involved covering the animatronic in green fleece and painting it to look old and decayed, all while facing various challenges along the way. Despite the obstacles, Jay’s voice work and the detailed fabrication of the animatronic made for a successful project that you’re excited to try for yourself.
As you watched Jay and Jaimie’s transformation of the animatronic into Springtrap, you were impressed by their detailed process of recreating the iconic character. From adding eyerings and eyelids to completing the animatronic with lightweight arm parts and a detailed head and ears, each step brought the DIY project closer to its eerie final form. The mix of EVA foam and 3D printed parts, combined with fabric and paint, resulted in a realistic and impressive full-size Springtrap animatronic that you can’t wait to recreate with your own creative touch.

Creating the Base Animatronic
To start creating the DIY Springtrap animatronic, you used a Target animatronic skeleton as the base. This skeleton provided the structure and movement needed for the animatronic character. To give the skeleton texture and a realistic appearance, you applied spray glue and cotton. This technique helped bring the skeleton to life and make it more suitable for the Springtrap character.
Making the Suit Parts
The suit parts for Springtrap were crafted using a mixture of EVA foam and 3D printed parts. These materials allowed for a combination of flexibility and precision in creating the details of the suit. After constructing the suit parts, you covered them in green fleece to give Springtrap a withered and decayed appearance. The final step involved painting the suit to match Springtrap’s iconic look.
3D Printing Springtrap’s Suit
Using 3D printing technology, you recreated specific parts of Springtrap’s suit to ensure accuracy and detail. This process involved creating intricate pieces that captured the essence of Springtrap’s design. Once the parts were printed, you covered them with fabric and painted them to match Springtrap’s appearance, adding the final touches to complete the suit.


Challenges Faced During the Project
Throughout the project, you encountered challenges related to the weight of the animatronic arm parts. To overcome this obstacle, you had to reconstruct the arm parts using foam materials. By innovatively using foam, you were able to reduce the weight of the arm parts while maintaining the structural integrity needed for the animatronic character.
Creating the Head and Ears
To create Springtrap’s head and ears, you utilized foam crafting techniques. This process involved sculpting the foam to shape the head and ears, providing a foundation for the final details. Once the foam pieces were shaped, you added paint detailing to enhance the realism of Springtrap’s appearance, ensuring that the head and ears matched the character’s iconic look.
Final Touches and Details
As the project neared completion, you added eyerings and eyelids as final details to bring Springtrap to life. These small touches contributed to the overall authenticity of the animatronic character. Additionally, you completed the animatronic with extra arms for a giveaway, incorporating a fun element for viewers to enjoy.
DIY Halloween Props and Decorations
In addition to the Springtrap animatronic project, you explored other DIY Halloween projects on Jaimie and Jay’s channel. This included a range of creative and spooky decorations that viewers could make and enjoy for Halloween. By showcasing a variety of DIY projects, you provided inspiration for Halloween enthusiasts looking to enhance their holiday celebrations.
Acknowledging the Five Nights at Freddy’s Franchise
It is important to acknowledge that Springtrap is a character from the popular game series created by Scott Cawthon. The Five Nights at Freddy’s franchise has captivated fans with its unique characters and engaging gameplay. Additionally, the voice acting for Springtrap was done by Jay, adding a personalized touch to the animatronic creation.
Gratitude and Sign-off
To conclude the DIY Springtrap animatronic project, you thanked viewers for watching and supporting the creative endeavor. By expressing gratitude to the audience, you showed appreciation for their engagement and interest in the project. As a final sign-off, you wished viewers a ‘Stay Wicked and Happy Halloween!’, spreading a positive and festive message.
Conclusion
In summary, the DIY Springtrap animatronic project was successfully completed through a series of creative techniques and challenges. By utilizing materials such as EVA foam, 3D printing technology, and fabric, you were able to bring Springtrap to life with intricate detail. Encouraging viewers to try their hand at DIY animatronics, you inspired creativity and innovation within the community. As the project came to a close, Springtrap emerged as a thrilling and authentic character, ready to delight and entertain audiences during Halloween and beyond.
