For your Halloween decorating needs, check out the AtmosFX Window Projection Material. Discover more about AtmosFX by visiting their website at http://atmosfx.com and explore their exciting content on their YouTube Channel at /atmosfearfx. Hey there, it’s Rick! With only 14 days to Halloween, I wanted to share with you a really cool digital decorating idea. In my first video, I introduced the AtmosFX Ghostly Apparitions DVD, which is filled with various spooky scenes. You simply plug it into a DVD player and project it onto a screen that can be placed either inside or outside your window. To achieve that haunted mansion effect, the AtmosFX Window Projection Material is perfect! It’s a 4×6 semi-transparent screen that handles the projected images really well. You can also use it for Christmas decorations, so it’s not just limited to Halloween. In addition to the digital decorations, I’ll also set up some other spooky props and lighting effects, like Hue light bulbs and fake candles, to create a truly immersive experience. I can’t wait to see how it all turns out, so stay tuned for more videos leading up to Halloween!

What is AtmosFX Window Projection Material?
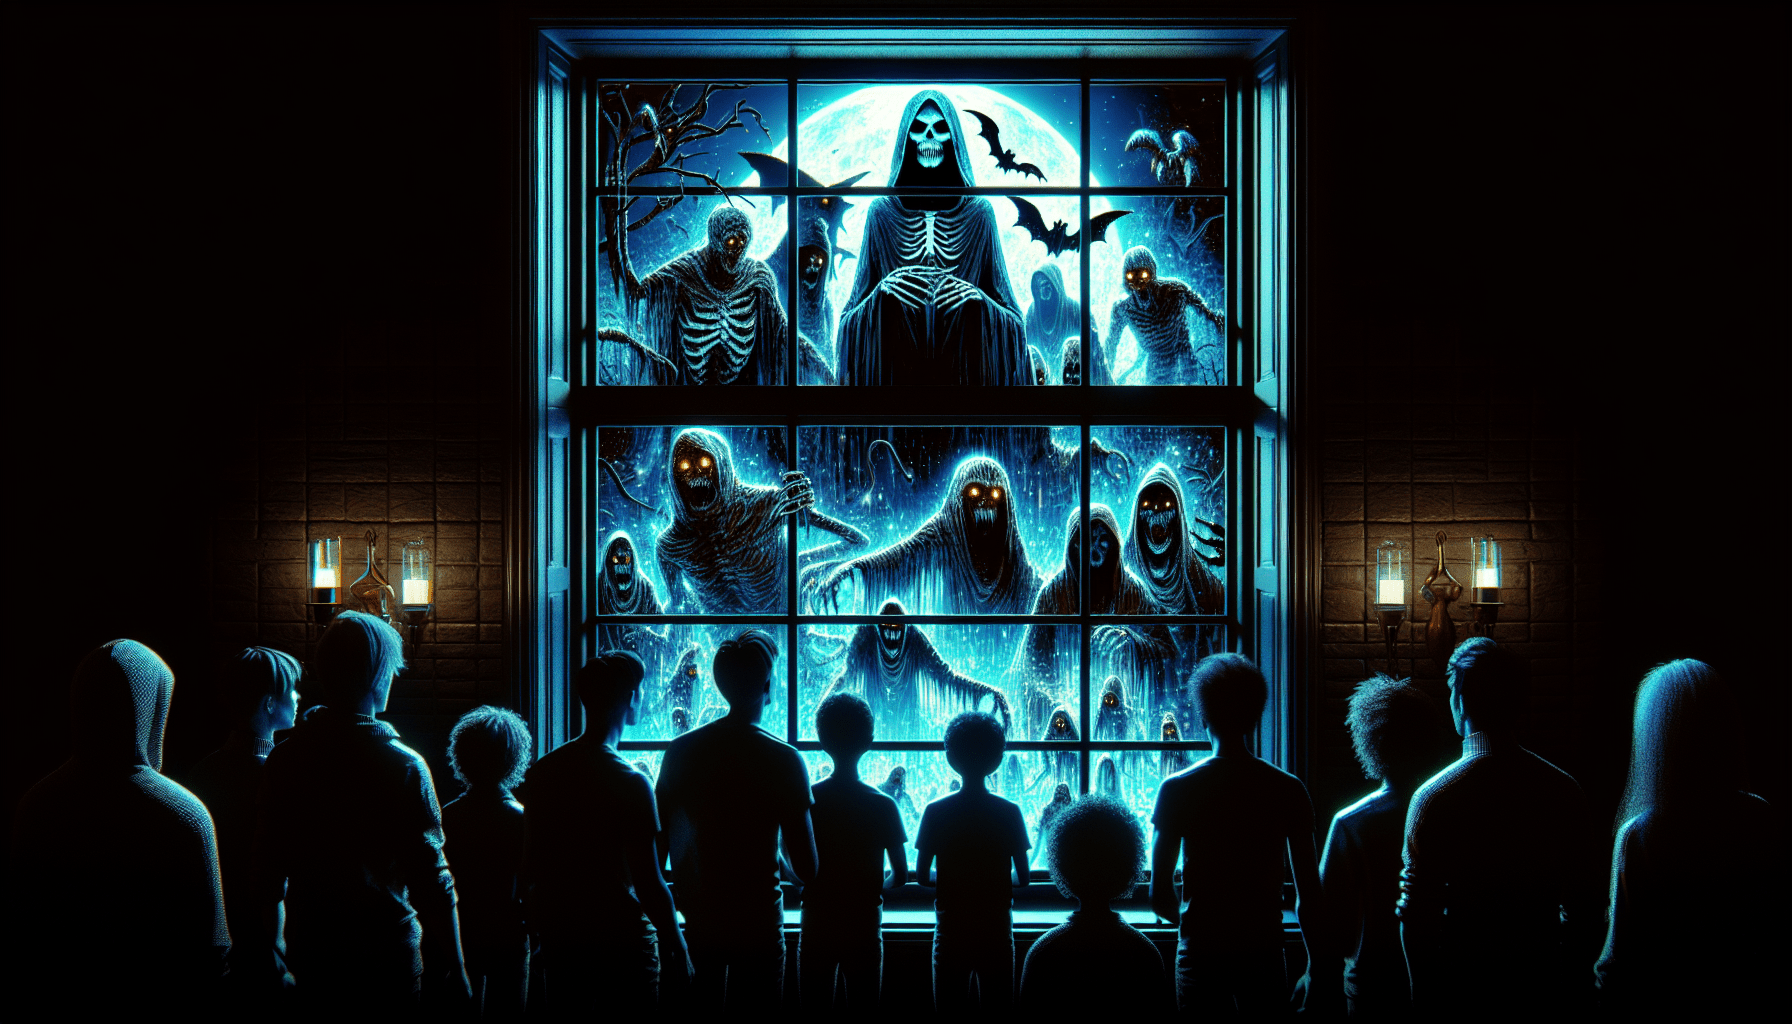
AtmosFX Window Projection Material is a unique product designed to enhance your Halloween and Christmas decorations by creating a holographic experience. This innovative material allows you to project images onto your windows, creating stunning and immersive displays that will amaze and delight your friends and neighbors.
Description of AtmosFX Window Projection Material
The AtmosFX Window Projection Material is a 4×6-foot screen made of semi-transparent material. It is specifically designed to handle projected images with clarity and precision, allowing you to achieve a realistic and vibrant display. The material is lightweight and easy to work with, making it ideal for window decorations.
Suitable for Halloween and Christmas decorations
While the AtmosFX Window Projection Material is particularly popular for Halloween decorations, it is also suitable for Christmas displays. The material can be used to project a variety of scenes and themes, allowing you to create a festive atmosphere for both holidays.
Advantages of Using AtmosFX Window Projection Material
Creates a holographic experience
One of the main advantages of using the AtmosFX Window Projection Material is its ability to create a holographic experience. By projecting images onto the semi-transparent screen, you can create the illusion that objects or characters are appearing and moving within your windows. This adds a highly immersive element to your decorations and creates a captivating visual display.
Easy to set up with a DVD player and projector
Setting up the AtmosFX Window Projection Material is a breeze. All you need is a DVD player and a projector. Simply connect the DVD player to the projector, insert the AtmosFX DVD, and project the images onto the window screen. The material is designed to be easily hung and positioned, ensuring a hassle-free setup process.
Semi-transparent and handles images well
The AtmosFX Window Projection Material is made of a semi-transparent material that allows light to pass through while maintaining the integrity of the projected images. This means that the material effectively displays the projected scenes with vibrant colors and sharp details, enhancing the overall quality of your decorations.
Can be used for various window decorations
The versatility of the AtmosFX Window Projection Material allows you to use it for a wide range of window decorations. Whether you want to create a spooky haunted house scene for Halloween or a magical winter wonderland for Christmas, the material provides a blank canvas for your imagination. You can easily switch between different AtmosFX DVDs to match your desired theme.
Other Required Materials for Halloween Decorating
In addition to the AtmosFX Window Projection Material, there are a few other materials and tips that you can use to enhance your Halloween decorations:
Tips and tricks from AtmosFX YouTube channel
The AtmosFX YouTube channel is a valuable resource for learning tips and tricks to improve your window projections. The channel provides tutorials, inspiration, and behind-the-scenes looks at how to create the most impressive displays. It’s worth checking out to gather ideas and gain insights into setting up your decorations.
Choosing the right screen material
If you decide to use a different screen material for your window projections, it’s essential to choose one that can handle the images effectively. The AtmosFX YouTube channel recommends bringing a flashlight when shopping for screen materials and shining it through them to see how well they handle the projected images. This will help you make an informed decision and ensure the best visual quality.
Using flashlights to test screen material
As mentioned earlier, using a flashlight to test various screen materials can be an effective way to determine their suitability for window projections. Shine the flashlight through the material to see how well it displays the light, as this will give you an indication of how it will handle the projected images. This technique is especially helpful if you want to explore alternatives to the AtmosFX Window Projection Material.
Introduction to AtmosFX Window Projection Material
To get started with the AtmosFX Window Projection Material, it’s essential to familiarize yourself with its features and capabilities. The material comes folded in a box and may initially have creases. However, these creases can be easily removed by steaming the material gently. It is semi-transparent and designed to handle projected images, providing you with the ideal canvas for creating captivating displays.
Setting Up the AtmosFX Window Projection Material
Now that you have all the necessary materials, it’s time to set up the AtmosFX Window Projection Material. Follow these steps to ensure a smooth installation process:
Removing creases from the projection material
When you first receive the AtmosFX Window Projection Material, it may have visible creases due to folding during shipping. To remove these creases, gently steam the material using a handheld steamer or an iron on a low setting, making sure to keep it moving and avoiding excessive heat. Steaming will help the material become smooth and ready for installation.
Properly hanging and positioning the screen
Once the creases have been removed, it’s time to hang and position the screen. Use the included hooks or adhesive strips to securely attach the material to your window frame. Make sure to hang it evenly and tautly, ensuring that there are no wrinkles or sagging areas that could affect the projection quality. Take your time to ensure the screen is positioned correctly for optimal viewing.
Placing the screen in the window
After you have hung the AtmosFX Window Projection Material, it’s time to place it in the window. Carefully slide the screen into the window frame, ensuring that it fits securely and covers the entire opening. Adjust the positioning if necessary to achieve the desired effect. It’s important to make sure the screen is visible from outside to maximize the impact of your decorations.
Additional window decorations
To enhance the overall effect, consider adding additional decorations to the window. You can use props like spooky skeletons, signs, or other Halloween-themed items to complement the projected images. These additional elements add depth and dimension to your display, making it even more impressive and engaging.
Enhancing the Atmosphere with More Decorations
To create an immersive and captivating atmosphere, consider incorporating the following elements into your Halloween decorations:
Using Hue light bulbs for colored lighting
To add a vibrant and dynamic element to your display, use Hue light bulbs. These smart light bulbs allow you to change the color of the lighting to match the mood or theme of your decorations. By synchronizing the colors with the projected images, you can create a fully immersive experience that will captivate viewers.
Addition of fake candles for ambiance
For added ambiance and a touch of warmth, consider using fake candles in your window display. These battery-powered candles create a cozy and inviting atmosphere while adding an extra layer of visual interest. Place them strategically around the window to enhance the overall effect of your decorations.
Optional decorations like skeletons and signs
To personalize your Halloween display further, you can incorporate optional decorations such as skeletons, signs, or other themed items. These additional props can add a spooky and playful element to your decorations, making them more engaging and entertaining. Consider your desired theme and choose decorations that align with it to create a cohesive and compelling display.
Adding Sound Effects to Complete the Experience
To fully immerse your audience in the Halloween experience, adding sound effects is essential. Sound plays a crucial role in creating ambiance and setting the mood for your decorations. Consider the following when incorporating sound effects into your display:
The importance of sound in creating ambiance
Sound is a powerful tool for creating ambiance and setting the mood for your Halloween decorations. From eerie music to spooky sound effects like creaking doors or howling winds, the right sound can evoke a sense of anticipation and excitement. By adding sound to your display, you enhance the overall experience and make it more immersive for viewers.
Choosing spooky soundtracks or effects
When selecting soundtracks or effects, choose ones that align with your desired theme and create a spooky atmosphere. Atmospheric music, ghostly whispers, and chilling sound effects can all contribute to the overall effect of your decorations. Take the time to explore different options and find the perfect audio accompaniment for your display.
Synchronizing sound with the projected images
To create an even more engaging experience, synchronize the sound effects with the projected images. This can be done by connecting a speaker system to your DVD player or projector and adjusting the timing of the sound to match the actions and movements in the scenes. By synchronizing the sound and visuals, you create a cohesive and immersive experience for viewers.
Timeline for Decorating with AtmosFX Window Projection Material
To ensure a smooth and organized decoration process, consider following a timeline for setting up your AtmosFX Window Projection Material. Here is a suggested timeline:
Planning and scheduling the decoration process
Start by planning and scheduling the decoration process. Determine how many days you have until Halloween and allocate specific days or time slots for each step, including hanging the screen, setting up additional decorations, and syncing the sound effects. Having a clear plan in place will help you stay on track and ensure that everything is ready for the big finale.
Pinning up the window decoration over multiple days
To create a dynamic and visually appealing display, consider pinning up the window decorations over multiple days. By gradually adding elements to your display, you can build anticipation and excitement for the final result. This approach also allows you to make any necessary adjustments or additions as you go along, ensuring that your decorations are perfect for Halloween.

Expectations for the Final Halloween Display
As you progress through the decoration process, you can look forward to the following expectations for your final Halloween display:
Anticipation for the big finale on Halloween
As the days pass and your decorations come together, you and your viewers will experience a growing sense of anticipation for the big finale on Halloween. Seeing your hard work and creativity culminate in an impressive and captivating display will be incredibly rewarding and exciting for everyone involved.
Continued content updates and progress updates
Throughout the decoration process, consider providing progress updates and continued content updates to your audience. This can be done through social media, blog posts, or even video updates. Sharing your journey and the evolution of your decorations will keep your viewers engaged and excited about the final display.
Encouragement to subscribe and engage with more content
As you near the completion of your Halloween display, invite your viewers to subscribe to your channels or engage with more of your content. This not only helps build your audience but also creates a sense of community and shared excitement about your decorations. Encourage your viewers to share their own Halloween experiences and to interact with you and others in the comments section.
Conclusion
The AtmosFX Window Projection Material is a versatile and innovative product that allows you to create mesmerizing Halloween and Christmas decorations. With the ability to project holographic images onto windows, this material enhances the atmosphere and creates an immersive experience for viewers. By following the tips and suggestions provided in this article, you can unleash your creativity and create stunning displays that will impress and delight. So get ready to transform your windows into captivating portals that transport your audience to a world of holiday magic and spookiness.
